Review of THELEMA SOLO 100W
The THELEMA SOLO 100W KIT is sold in a decent sized cardboard box. The main base color is white, but the side edges will match the design of the mod cover (in my case under “carbon”). On the front side is a photo of the device in the actual color and with icons of the main features.
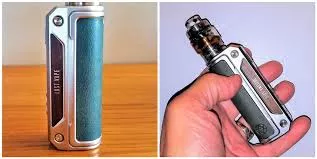
You can see the appearance of the THELEMA SOLO 100W kit with UB PRO POD TANK on the photo above. The design is strict and clear (in fact, it’s the same THELEMA QUEST, only slightly smaller due to the single battery), sharp chopped edges, rounded corners and a few decorative screws on the beveled sides of the panels.
Specifications
Dimensions of the battery pack 97 * 28 * 39 mm
Tank dimensions 47 (height) * 28 (diameter) mm. Seat ∅26 mm
Total dimensions of the set 145 * 28 * 39 mm
Tank volume 5 ml
UB PRO vaporizer format
Mod power 5 – 100 watts
Thermocontrol 200 – 600°F
Output Voltage 0.7 – 8 Volts
Weight About 150 grams
Screen size 0.96” (80*160 dots)
Supported resistance 0.1 – 5.0 ohms
18650/20700/21700 battery format
Charging current 5V, 1.5A
QUEST 2.0 chip model
Protection systems Short circuit, battery discharge, overheating, puff cutoff 10 seconds
Operation modes Wattage/Voltage/bypass/TC (Ni, Ti, SS316, SS904)/VPC
UB PRO POD
On top of the tank there is a conical-shaped 810 driptip (both inside and outside) on two orings.
The tank is disassembled exactly into two halves, by the thread between the top part and the base. In the upper part of the tank you can see a bell that holds the coil, and in the lower part – a small round plate with four petals-springs, which will also rest on the vaporizer and ensure its tight fit. australian vape shop melbourne The plus pin will be pressed in through the force of the spring-loaded contact in the battery mod’s connector.
UB PRO POD TANK Overview – Installing the Vaporizer
The vaporizer is simply inserted into the top part, after which you only have to screw on the bottom part.
UB PRO POD TANK review – refilling and airflow setting
Next, open the refill plug, pour in the liquid and wait at least three minutes for the mix to soak up the cotton in the coil.
UB PRO vaporizers
At the moment Lost Vape company produces two types of coils of the new UB PRO format. Both of them will be one piece each enclosed in the THELEMA SOLO 100W kit. The first one, with blue o-rings, is made on a vertical grid of nickel, has a resistance of 0.15 ohm and is designed for vaping at power from 70 to 90 watts. The second, with green orings, is also on a grid, but already made of stainless steel and is designed for vaping in thermocontrol mode at temperatures from 260 to 290 degrees Celsius, or at 60-70 watts, its resistance is twice as high – 0.3 ohm.
UB PRO review – maintenance-free vaporizers
For those who are particularly frugal or prefer to do their own winding, there is the UB PRO RBA maintenance-free base on sale.
THELEMA SOLO 100W review – appearance
Let’s get back to the main element of the THELEMA SOLO 100W KIT – the battery pack. What can we say – it is well made and of high quality, you can immediately feel the integrity and monolithic design.
The grip of the mod is excellent, it lies firmly and securely in the hand, thanks to the textured surface on the lid, which, in my case, although it looks like carbon fiber, but feels more like rubberized vinyl.
THELEMA SOLO 100W review – appearance
The removable lid fits snugly and securely, with no play in any of the planes, which can’t help but make me happy.
THELEMA SOLO 100W – bottom view
At the bottom of the battery pack, there is nothing but a protruding edge that replaces the feet. This way, the large base surface will retain its original appearance longer and will be less prone to inevitable scratches from being on hard surfaces. It is also labeled with mandatory marks and brief legal information.
Overview THELEMA SOLO 100W – Connector
The top plate contains a 510 spring-loaded connector, realized as a 24 millimeter diameter steel washer secured with three screws. The pad protrudes a fraction of a millimeter above the top edge, which ensures the integrity of the mod’s paintwork. At the same time, there are no grooves or grooves on it, reducing the chances of the atomizer sticking to the mod. The maximum base diameter of a tank or a dripper that can be installed on the mod without aesthetic losses is 26 millimeters.
Interface and Controls
The controls and interface are completely copied from the THELEMA QUEST 200W battery pack, which is not surprising, because in fact the only difference between the two is the number of batteries and the limited power output of 100 watts. You instantly get used to the control and navigation in the menu with the three bottom buttons, the color screen is quite informative, and all the inscriptions are intuitive even without a deep knowledge of English. The Type-C charging port is already used to modern mods, and its location (at the bottom of the battery pack, but on the side) can be called optimal.
THELEMA SOLO 100W KIT Overview – Interface
After switching on the screen will show the resistance of the vaporizer, the battery charge in the form of a bar and percentage, the selected operating mode and the current power (or temperature), once again the resistance of the vaporizer, the number of puffs made, the set preheat mode and the individual preset settings.
We move the “cursor” on the screen with the first and third buttons, and confirm the central button.
The top line (by default it is Power) is a choice of one of 5 vaping modes: varivatt, varivolt, mechanical mod mode (Bypass), temperature control and VPC.
Varivatt mode allows you to change the wattage from 5 to 100 watts.
Thermocontrol mode – you can adjust the temperature between 200 and 600°F. Here you can choose the material: nickel, titanium, two types of stainless steel SS316 and SS904.
VPC mode – self-adjusting power/time graphs.
When selecting the number of puffs – you can reset the value.
Bottom line (Setting) – switch to mod settings.
Atomizer – adjust resistance and power.
Screen – adjust the brightness of the screen.
Color – select color scheme.
User – setting and selecting one of three presets created “for yourself”.
Reset – reset the settings to factory defaults.
About – view the firmware version.
You May Also Like

Review of Hellvape Dead Rabbit 3 RDA
21 July 2023
Review of Koopor Mini 2 80W TC
18 November 2023

