Review of Eleaf iStick Pico LE
Appearance of Eleaf iStick Pico LE
The familiar, already classic shape and design of the Pico do not need any special introduction, as they are familiar to everyone who has been vaping for at least two years.
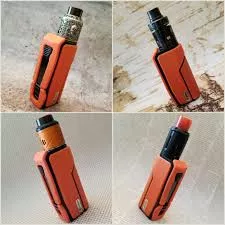
What is remarkable in the new version of Pico Le are the buttons on the front panel and the overlay made of something resembling leather and stitched with threads.
Boxmod iStick Pico Le with Nevermore RTA tank (24mm)
What can’t be missed is the offset battery compartment cover, so the connector allows you to install atomizers up to 26 mm.
Colors of Eleaf iStick Pico Le Bo
And, as you can clearly see in the photos in this review, australian vape shop our test subject has a shiny chrome surface that dazzles the owner at the slightest exposure to sunlight.
Features of the Eleaf iStick Pico Le
Materials: zinc alloy, eco-leather
Dimensions: 27.7*51.8*71.1 mm
Weight: 83 g (with battery: 125)
Battery used: 18650 (purchased separately)
Operating modes: varivatt, thermocontrol (nickel, titanium, stainless steel, TCS), preheat
Power output: 1-75W
Temperature control: 200 – 600°F/100 – 315°C
Display: monochrome 0.49″
Charging current: 5V/2A
Charging connector: USB Type-C
Types of protection:
low or high resistance
board overheating
short circuit
incorrect polarity
battery overcharge and overdischarge protection
Color options: Green Black, Full Black, Black Grey, Orange Brown, Yellow Blue
Appearance of iStick Pico Le from the top Appearance of iStick Pico Le from the bottom
From above and below you can perfectly see that the device has an uneven thickness, or rather expands from 24 mm on the back side to 27.5 mm closer to the connector. And it is precisely because of the “pusatnosti”, in my opinion unreasonably large, I have the main complaint about the mod. It is not as comfortable in my pocket as for example the same Swag 2 (there is a maximum thickness of 25 mm and curved shape of the flask). The connector pad is typical for Eleaf/Wismec/Joyetech products – small diameter, protruding, slightly raised minus part above the body, reducing the chance to get radial scratches from atomizers. The plus pin is spring loaded and has a good amount of travel. On the bottom of the case, there are only three tiny holes for emergency battery venting and an engraving with two standard icons. And it is at the bottom that you will see the first scratches – the chrome plating is very delicate.
iStick Pico Le battery compartment cover
The battery cover is equipped with two rows of notches all around. We can’t say that they are particularly tenacious, but they allow you to get to the battery without any problems. However, they will do their job exactly until the hour when they get clogged with dirt. So do not hesitate to wash the cover sometimes, and at the same time wipe the threads on it and in the fashion to reduce the number of sags in the electrical circuit.
iStick Pico Le battery compartment cover Installing the battery in iStick Pico Le
The battery is installed minus-side up, with the plus-side, spring-loaded contact inside.
Screen and controls of Eleaf iStick Pico Le
And the rest of the assembly does not cause any complaints – neither the buttons do not rattle (although Fire rattles a little under the finger), nor the case does not squeak. What Pico Le really can’t boast of is the screen, which seems to be getting smaller and dimmer with each new device. However, here the display is made vertical, which allowed to accommodate more information and make the charging connector and “-” and “+” buttons not on the bottom, as before, but on the front panel. However, the numbers on the display are so small that I sincerely sympathize with all the owners of the device with farsightedness.
Stick Pico Le boxmod screen in varivatt mode
After inserting the battery, the board requires to be turned on (every time!) by pressing Fire five times, and the same combination turns off the electronics. The display simultaneously shows the graphical icon of battery charge, the lock of adjustment buttons, the set values of power or temperature, a line with additional parameters (it can be voltage, power, number of puffs or just a picture of the “equalizer”) and at the very bottom the winding resistance. A couple of words about resistance. Since I couldn’t find how much the board supports in the manufacturer’s specifications, I screwed my old Petri V2 RDA with 0.06 ohm winding onto iStick Pico Le. And the device worked! Whether it’s a bug or a feature, I can’t say.
Eleaf iStick Pico LE menu
To get to the device menu, you need to press Fire three times. There are the following items and subparagraphs:
MODE POWER – selection of varivatt mode
MODE TEMP NI – temperature control with nickel winding
MODE TEMP TI – heat control on titanium
MODE TEMP SS – heat control on stainless steel
MODE TEMP M1 – heat control with manually set material resistance coefficient
SET SYSTEM – system settings
SYS VPW SET – selection of what to display on the main screen in the line under the main values: VOLT/WAT – voltage or wattage (in thermocontrol mode), PUFF – number of puffs or WAVE – static EQ animation frame (“comes to life” when you press Fire)
SCRN ON/OFF – ON – stealth mode on (the screen is not lit when you press Fire), OFF – the screen turns on and lights up at each puff.
PREAHEAT – preheat settings, POWER – power, DURA – duration, EXIT – exit
OVER TIME – cutoff setting, 5S – 5 seconds, 10S – 10 seconds, 15S – 15 seconds, OFF – disabled
M1 SET – manual setting of material temperature coefficient K VALUE
VERN CHECK – HW hardware and FW firmware versions
DEFAULT – factory reset YES/NO
BACK – return to the main screen
In addition, you can lock the adjustment buttons, so as not to accidentally disable the settings, it is done by simultaneously holding down the “-” and “+” buttons until the inscription “+ – Lock” appears. In the same way the unit is removed. Pressing all three buttons activates or deactivates the AST vaporizer mode.

Review of Dovpo MVP Box Mod
You May Also Like

Review of Nugget X Kit by Artery
1 April 2025
Review of Joyetech ESPION Silk with NotchCore
7 March 2025
